Use the default Sign Up page to let people subscribe to your distribution lists. You can link to it from your organization's website or embed the URL in an email.
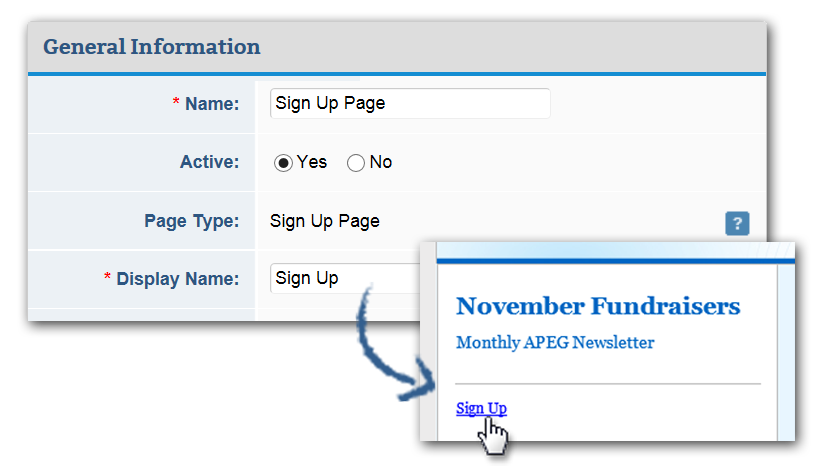
1 Access your website pages. Select Website Pages in the blue navigation bar. Then, click Sign Up Page.
2 Edit the default settings. The Page Setup tab opens by default. Click Edit.The name is for your reference only. Change it if you'd like. But ensure Active is switched to Yes.If necessary, edit the Display Name (what appears in the data tag that opens this page).
Consider entering a Data Tag Code if you're creating two sign up pages. This will help you locate the link when adding it to emails.
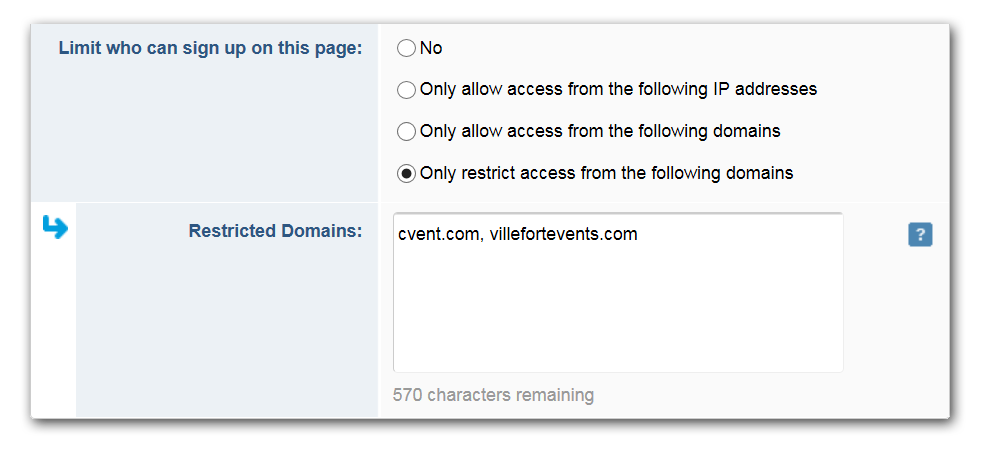
There's more than one way to restrict who can subscribe. These include:
- To limit access by IP address (codes that identify a computer network), choose "Only allow access from the following IP addresses" and list the IP addresses, separated by commas, in the following format: 123.4.5.6.
- To limit access based on domain, select the appropriate option and list the domain names, separated by commas, in the following format: cvent.com.
Under Search Engine Settings, determine whether to make this page visible to anyone searching the internet.
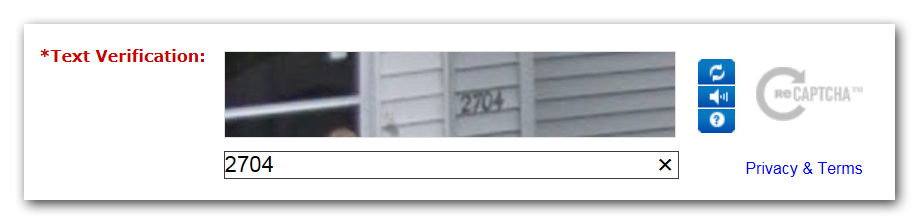
Scroll down to Page Settings. Ensure your subscribers are human by enabling a user verification process. People will need to enter the code they see in a CAPTCHA image before continuing.
You can require that subscribers type their email twice, just to make sure it's correct.
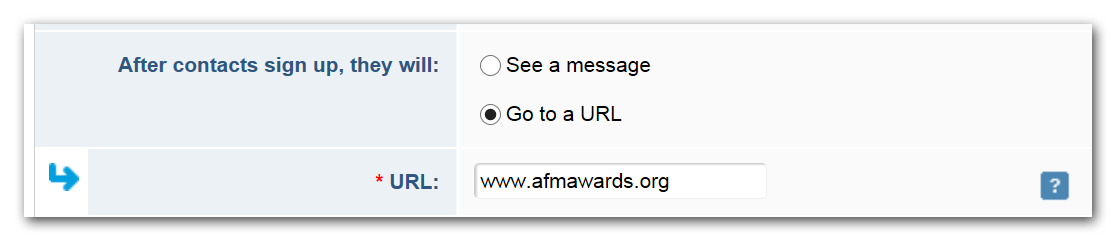
Determine what happens after people sign up. Want them to see a message? Type it in the box that appears. Or route them to a site, such as your organization's, by selecting Go to a URL. Enter the web address in the field that appears.
To send an email notification, thanking people for signing up, switch the appropriate option to Yes. Enter the name and email the notification will be from and edit the default text in the Message box.
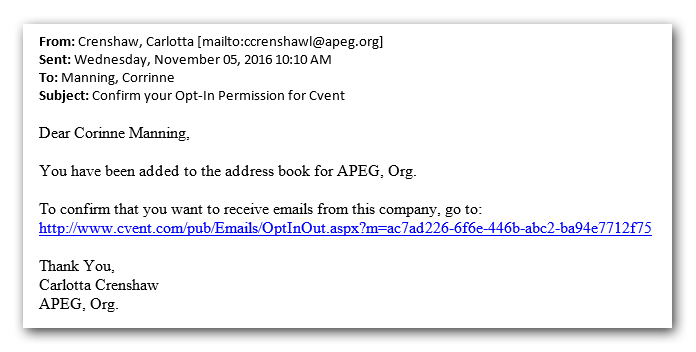
You can also send new subscribers an automatic opt-in email, letting them confirm that they do in fact want to receive your emails. Keep in mind, the content of this message cannot be changed.
Once you're done, click Save.
3 Choose what contact information to collect. By default, people must enter a first name, last name, and email on your page, but you can collect more information. To do so, click the neighboring tab, Contact Fields, then Edit.
Click Add Field, then click Select beside any additional fields you want.

Use the textbox in the Display Name column to rename the fields. In the Display Setting column, decide how the fields will show up. Your options include:
- Required displays the field and will not let people continue until they've filled it out.
- Visible displays the field but people can ignore it.
- Read-Only displays the subscriber's information as it exists in their contact record but does not allow them to change it.
Accidentally select the wrong field? Click  to remove it or
  to reorder it.
Once you're done, Click Save.
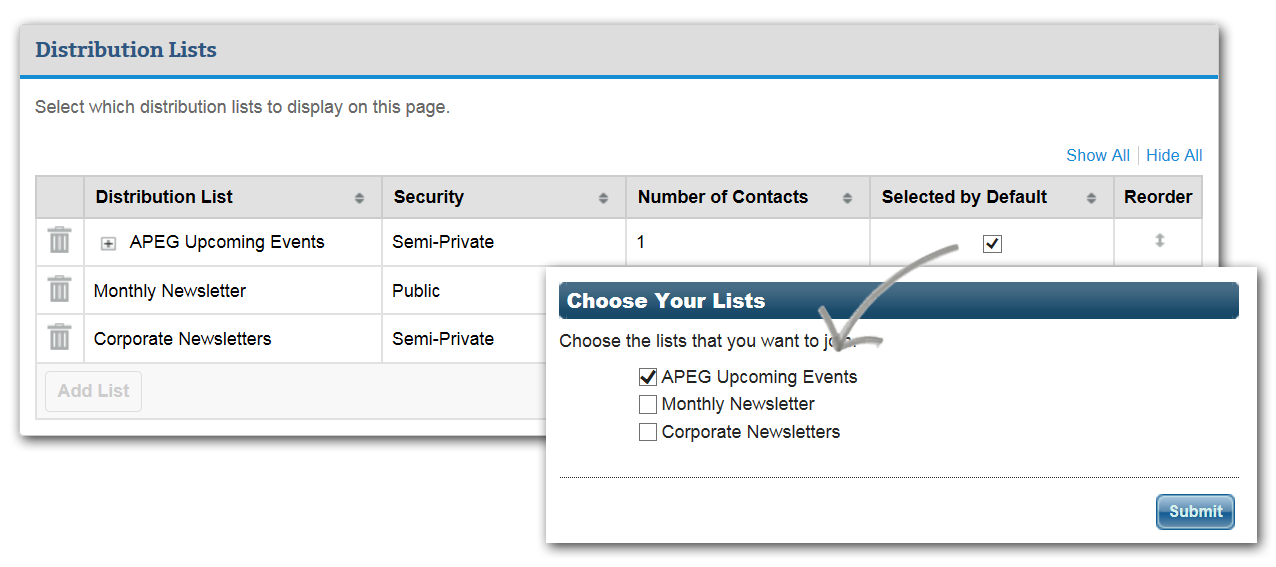
4 Associate distribution lists. Click the neighboring tab, Distribution Lists, then click Edit. All the public and semi-private lists are displayed on your page by default and will appear here.
Click to remove one. Click Add List to include one.
When you check the box in the Selected by Default column, that list will already be checked when the person arrives on your page.
Written descriptions for your lists? Show them off by switching "Display descriptions of the distribution lists" to Yes.
Once you're done, click Save.
5 Edit the default text. Click the neighboring tab, Presentation, then Edit.
Modify the default instructions by typing in the appropriate text box. Click <HTML> to access the HTML Editor.

Where applicable, you can change the Header Label or remove it entirely by switching Display Header to No.
Click Save. If you used the HTML Editor, be sure to save on the original page as well.
6 Choose a template. Click the neighboring tab, Display Options.
Choose a theme by clicking Change Theme, then select a new one from the pop-up. Do the same to select the button color.
Scroll down to the Colors section. Adjust a color by entering a hex value in the textbox or choose one by clicking the color block, selecting a hue from the pop-up, and clicking OK.
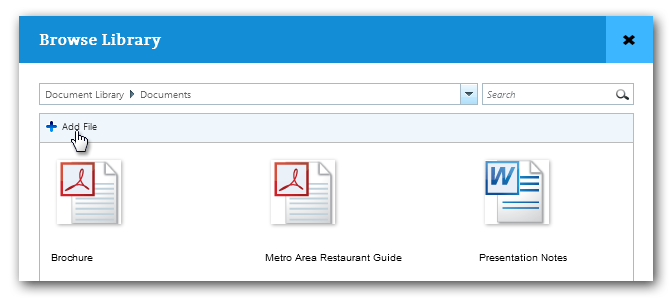
To add your own header image, scroll down to the Header section and click Browse Library.... Double-click the appropriate folder, select the file, and click Insert. Don't see your image? Open a folder and click Add File to locate the file on your computer or network.
Anything you add in the HTML field will appear directly below the header image.
Select how the header will align.
To add information to the bottom of your page, such as a logo or your company's contact info, scroll down to the Footer section and add your content in the HTML field. Click HTML... to access the editor. Once you're done, click Save. If you used the HTML Editor, be sure to save on the original page as well.7 Link people to your page. To access the Sign Up page link, click Website Pages in the blue navigation bar. Open the Sign Up page by clicking its name. Then, scroll down to the Generic Weblink to find the URL.
You can also embed the {[EM-SIGNUP LINK]} and {[EM-SIGNUP URL]} data tags in your emails.